Tuesday, October 4, 2011

Day 261- The Sweet Smell of Laundry

I don't know about you, but I looooove the smell of clean laundry. Especially sheets. Confessions of a sheetaholic right there. Sadly, our house has been full of smells of molding MDF, snake musk and sometimes bacon, but it HASN'T smelled of laundry.

Today friend(s) - hey, I'm being optimistic- that all changes. As you learned in this post, we had a little issue with the dryer hose terminating in a void under some stairs. So we called in the big guns, otherwise known as my Dad. Dad was kind enough to fly alllll the way from California to help around the house, and he brought his hole saws with him. As a side note, my dad also attempted to carry on all these hole saws. This wasn't a good idea, as one might imagine. But onward!

No Sir, you may not carry those on
So this is how we blew a hole in the exterior of the house and vented the dryer outside.

First we figured out where the heck to make the exterior hole. We knew there was a void that was wood, we knew it was next to the exterior wall. But we didn't know how much concrete might be in the way. So after measuring and wandering up and down steps, we did the logical thing. We drilled a hole in the wall with a large bore drill bit, you know, to see where it came out.

Hey, go inside and tell me if you see the drill bit

Turns out there was no concrete in the way! Score one for us. 

Note the wood inside

From the inside
However, the stair support WAS in the way. Score 1 to the house. Hmmmm, we'll get back to that one. But not to be dissuaded, we carried on and put a four and quarter inch hole in the wall, and once the house was vented, we left and made a trip to Home Depot to find materials tame the laundry beast.

Cage

Expandable foam

Flexihose

True duct tape

By the time we got back, the Hubbs was chomping at the bit to get into this laundry action, so I became superfluous and fetched tools as the men needed them. At this point Dad decided that the portion of the step was supported well enough and we just drilled through that wood too. Now we have a nice clear space of the flexihose.  The cage was inserted outside, to keep all the cave crickets, spiders, skeeters and mice out of the vent. Birds too. Damn nesting birds.

Then we taped that bad boy to the flexihose and taped THAT bad boy to the existing hose that was nailed to the joists and just wasn't coming out.


How YOU doin'?
Now for the moment of truth, we moved the dryer into the room, hooked it up, plugged it in and..... IT WORKS. SWEET BABY JESUS, IT WORKS AND IT'S HOT... oh, there might be some crap in the hose, but who cares? I can dry clothes without fear of a house fire! There was a little air leakage that we couldn't get to with the tape, so it was spray foam to the rescue.We also foamed behind the siding and under the cage to discourage pests from even thinking of entering.  When in doubt, spray foam it out!

Nothing a little spray foam can't fix


At this point, I had to go to work, and let's be honest, they didn't need me anymore. So I went to bring home the bacon, and the men folk went to work on the washer. Turns out that we needed new hoses, but by the time I got home we had lift off. Needless to say, I've been washing clothes slowly but surely. I'm a little nervous of running the washer and dryer together, but so far I have clean sheets, towels and bathrugs. None have been eaten and they all smell wonderbar! The best gift of all is that doing laundry is also helping remove the musty house smell.

My lovelies
Here's the to do list in this room as of now:

1) Replace the sockets and painted over light switches
2) Switch hinges on dryer door
3) Close hole by vent pipe
4) Remove linoeum and MDF subfloor
5) Replace with hardibacker
6) Tile
7) Paint  (something cheerful)
8) Figure out storage
9) Replace basement door with a firedoor
8) Close entrance to foyer and create a closet


Oh and here's a cave cricket to give you nightmares. :)

Hello friends!

Monday, October 3, 2011

Day 260 - Progress, finally

As I've mentioned, we didn't want to demo the kitchen when we first moved in, we wound up doing the demo out of necessity. But we are finally making some progress:

- We've chosen a sink and cabinets
- The plumber (covered under home warranty, woot!) is coming to fix the hole in the pipe.
- Layout for the cabinets is going on the floor this weekend so we can begin to tile
- Replacement of insulation is going up this week


I haven't mentioned that we ripped out some wall covering while removing the upper cabinets. At the time it was too depressing to finally close the hole in the floor only to open up the walls, but that's what happened. It wound up being needed, as we found yet another mouse nest and entry site. So out with the old insulation in with the new ( I confess, the new is still sitting in a roll on the floor, but we have it!). In addition, we had our first cold snap this weekend, and realized that we should replace all the insulation with a better thickness type, hence our little daytime project.

You'll notice, no where on that list is a counter top selection. While we would love to throw some quartz on there and call it a day, our frugalness is getting the better of us. We could go buy some cheapie laminate, but that's an awful lot of plastic to buy all at once, so we went back to the drawing board.

And now we have an idea that will take care of two things:

1) It will provide the base for quartz when we get around to buying counter top
2) It's inexpensive <--- We are huge fans of inexpensive things!

That's right ladies and gentlemen, we are going to use plywood as counter top. Please note we will poly the crap out of the plywood and make a pretty design under the poly, but it should be ok. Keep your eyes peeled for our project in the (hopefully) near future!

PS- We got a laser level this weekend... Oh my, disaster.

Tuesday, September 27, 2011

Day 254- My house, my Menagarie

Plastic update- We finally went through all the left over water from the hurricane and are starting to move to more grill cooking. This past weekend we went to home depot and managed a plastic free purchase. This can be done by buying cement board and 2x6s. Now that I think of it; building is a bit like cooking. If you cook or build from scratch, it's pretty easy to be plastic free. If you buy all prefab stuff, then you get lots 'o plastic. Words of wisdom right there.


In other exciting news; I found a snake in the basement. Yes, boys and girls, a snake. A black rat snake to be exact, which works well with killing the mice; not so well with me not freaking out.

Image from wiki, thank goodness

When the previous owners got read to sell the house, they had it painted with kilz in creamy white. We've found some old colors, and this was probably a good idea. On the downside, whoever they hired had apartment painter syndrome; which means it was just sprayed everywhere. Walls, windows, light switches, electrical sockets, that hardwood floors and the bathtub. Hubbs and I spent a week scrubbing hardwood floors to remove paint, and I'm just now getting to replacing the painted over electrical sockets. 

Normally, I'll replace one or two a day, just to make sure I'm not screwing up electrical. This requires that I go to the basement, turn off all power to the house and then commence working on sockets. Today when I went down there, I heard this sliding, rustling sound. At first, I thought it was the floor joists creaking because Hubbs was upstairs hanging curtains. But then I realized it was ALIVE and if I poked a ceiling tile, the sound would move. Of course, I ran upstairs and convinced Hubbs urgently calmly to come down and see what we had going on. You see he's tall and can reach the ceiling, whereas I would have to use a step ladder. Yes. That's my story. 

We pull down some ceiling tiles and find this:


See our snake?

Well, that's a four foot snake in our drop ceiling. Between the pipe leak, the mice and THIS we are unfinishing this basement and starting over. I'm convinced there is are voles, mice, rabbits, snakes, small children and perhaps some more cave crickets in the basement and IT FREAKS ME OUT. It's like Home Alone levels of basement anxiety. After some quick googling to make sure that we wouldn't die if the snake bit us (not that we wanted to be bitten), we convinced the snake to leave with a rake and a gentle nudge to the door. 


Snake V Rake

Yep, you should leave

He didn't get far enough away, so he was placed further away from the house

So, there is our first and hopefully last snake. Now if you'll excuse me, I have to go investigate all sounds in the whole house. And there are lots of sounds.


Sunday, September 25, 2011

Day 252: C'mon on baby, light my fire (hazard)

Our kitchen, which you have now had the pleasure of seeing, flows into the laundry room. So if we are going to take out a whole kitchen floor, why leave the linoeum in the laundry room alone? Why not do it all? So that was is the plan. However, after the debacle of removing kitchen flooring we thought we might wait a little bit and actually get a new floor in one room before ripping out the floor in another. Don't worry, we bought 540 square feet of tile, something or someone will be tiled!

So instead of removing the floor immediately, we chose to remove the old washer and dryer. I wanted to keep them, well, because I'm cheap and if it ain't broke, don't fix it! But the Hubs convinced me that washers and dryers that have sitting around gathering dust shouldn't attempt to clean our clothes. So we took them out to the dumpster and found a lovely, non-vomit inducing scene under the washer.

Again, it case you didn't see it last time

If you have never moved a washer or dryer to clean under the appliance, may I recommend you do so? I'm still shuddering at the smell and feel of cleaning that mess. You'll also notice in that picture we have a wonderful plastic hose protruding from a rather large hole in the wall. We saw that and said, hey well get one of those new fangled metal pipes and close up that hole. It'll be like new! But we didn't have a washer or dryer, so it went to the back burner.

Fast forward to two weeks ago, we helped my coworker move and she gave us her 3 year old washer and dryer as a thank you. SCORE! Free washer and dryer, now we don't have to wash our clothes in the creek (ok, a friends house, but you get the point)! And last weekend we were finally close enough to being out of underpants done enough with the kitchen, to work on this hole/pipe situation.

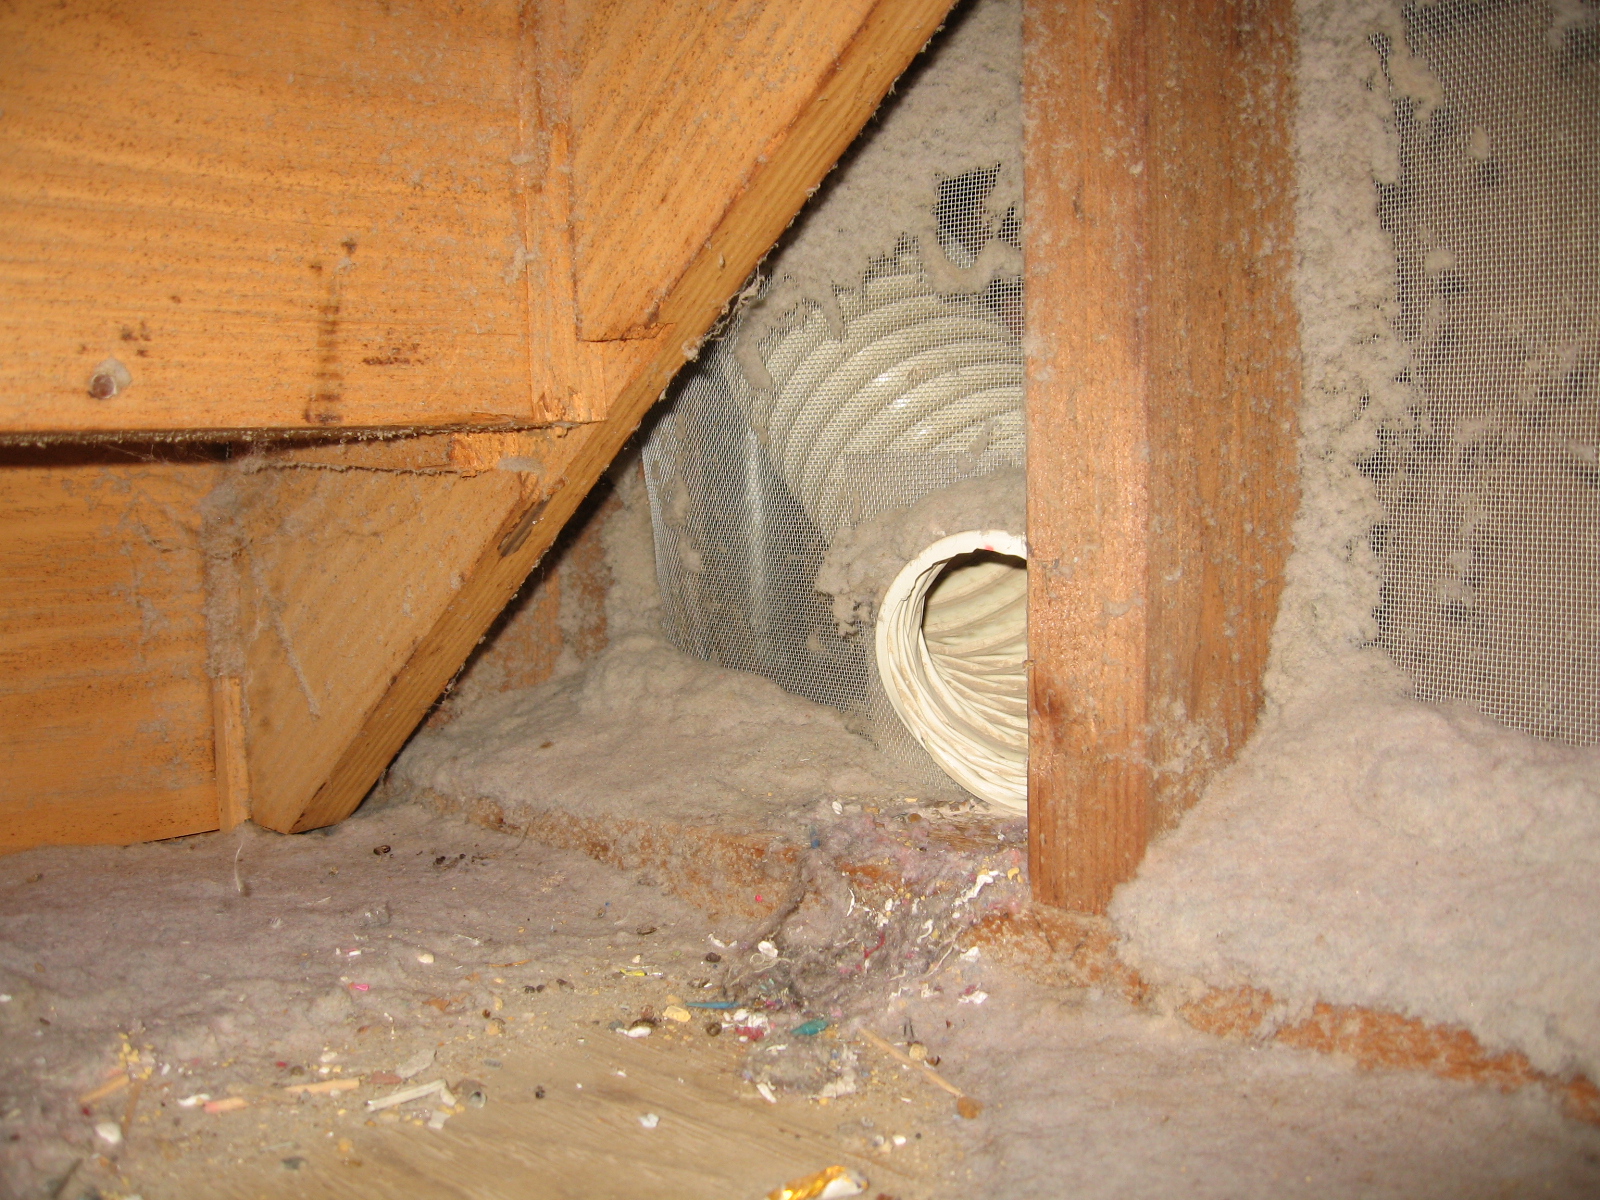
First I scouted around the outside looking for the vent. No dice.  So I looked further up the house, closer to the roof for a vent. Still nothing. Then I remembered this weird screened in area under the stairs one could access from the basement.


That's a strange place for dryer lint


When we pulled the screen off the joists, this is what we found:


Yes, that is a cubic yard of dryer lint in the house. Thank goodness it didn't catch fire and burn the whole house down. I guess the previous home owners were of the opinion that dryers don't need to vent outside, they just have to vent to where you can clean the lint. Please note that is a terrible idea. So while replacing the pretty plastic hose with a better metal one, we will also be blowing a hole in the outside wall to vent the dryer.

 I will keep you posted. And someday I dream of having all clean clothes. Thank goodness we have 9 sets of sheets and an obscene amount of towels.


Wednesday, September 21, 2011

Day 248- Kitchen Demo

Since we moved, the Hubs and I have been working furiously on the kitchen. Being plastic free while renovating a kitchen is basically impossible. For two reason:


1. We have nowhere to prep food, so most of our eating comes in the form of take out or prepackaged foods. I never get heartburn, but 4 weeks of eating out all the time will make your heart feel like a ghost pepper. 


2. We are doing the renovation ourselves. Hubs and I, and our four hands. Buying plywood and backer board is very plastic free, but buying tools and blade replacements is very full of plastic. We do our best to buy as little prepackaged equipment as possible, but sometimes you have to buy a 7" circular saw replacement, and it comes in one of those hermetically sealed plastic containers. Because heaven forbid that saw blade get germs on it before I cut my rotting plywood! Anyway, my daily trips to Home Depot haven't been plastic free, but we are still trying. 

So, let us talk about where we are in the renovation.


Here are some terrible pictures of what we started with in the kitchen:


Cooking area and (brown) sink

Breakfast nook

I know, how on earth could we possibly want to change this at all? The linoleum! The brown ceramic sink! The stove original to the 1960s?! Well, the stove didn't work, the floor was rotting and I don't have a good excuse for the sink, other than it wasn't attractive. So into the dumpster it went. 

 We knew that we wanted to have tile in the kitchen for durability, so I started scouting Home Depot. Many times they will have tile on clearance, and it was simply a matter of snagging a color we liked. Once we found tile, we knew it was time for the linoleum to come up..... And so began the problems. 

First we took up the kitchen linoleum. It was really easy, we scored the surface with a utility knife and then poured hot water all over the floor, followed up buy some scraper usage to remove the old linoleum (don't worry, we also checked to make sure there would be no asbestos particles due to removal). Well, under the that first layer we found soaking wet MDF as a sub floor. Okaaaaaayyyyy.... 


Well, this doesn't look good at all!

See that hole? It's been there for a month


Why is this floor wet? That's so strange. So the Hubs pulled out the dishwasher to find out if it was leaking. Turns out, it was leaking mouse nests. So now we have to remove the MDF and all the base cabinets because they are soaked in urine. Great. Out come the counter top and cabinets. And while we are at it, let's figure out why this part of the floor is soft, so Hubs opened up part of the floor where the cabinets used to be to find out that the plywood underlayment is also rotted. That was a month ago. 

Here are some progress pictures:

See the rotting plywood on the right?

Working on the last little bit under the pantry

Classy solo-cup drip catcher

Now the fridge won't fall through into the basement
As of yesterday, we finally closed up the hole in the floor and no longer have to worry about someone falling through the floor into the basement. So we are FINALLY making some progress. Who cares if we have a fridge in the dining room?! That's how we roll!

Next step is to get hardiback or cement board on top of the plywood and think about new cabinets. Has anyone used hardiback or cement board? Which one is better? What do you think for cabinets? Thoughts on paint colors?


**Solo cups are have been moved halfway across country and are 3-4 years old. No new plastic!

Thursday, September 8, 2011

Day 235- Post Move Blues

I left you last time, two weeks ago, with news that we bought a house and were moving. When The Hubbs and I left Texas to move to Maryland, while planning a wedding and dealing with several deaths; I figured that would have to be the hardest move ever, right? Wrong. So so wrong.

The real reason I've been away is because we started working on the house, and it turns out that we have A LOT more work to do.


 All these kitchen pictures? That's all gone. It turns out when a house sits empty for a year, it get mice. So instead of killing the mice in the walls, which would smell terrific, I'm sure, we gutted the kitchen. That table, the chairs and the bench are in the side room, supporting all the kitchen stuff. The floor, cabinets and counter top are gone, as is the sink.  This will be replaced at some point.

We are also working on the non-kitchen parts of the house:


All the carpet is off the hardwood and I just today finished hand scrubbing the floor. So now we can hang up sheets and get the kitchen sub floor up to work on the tile. 

Here's a look at what might lurk beneath your dryer..... If you have mice and three standard poodles. It smelled wonderful. I know you wish you had smell-o-internets


Remember when I mentioned that I though moving from Texas to Maryland would be hard? I was wrong. When The Hubbs and I moved in, it was raining, and then we got hit by a hurricane. So the first 5 days in our new home we had no power, no kitchen and mostly no furniture. It was so much harder; I still don't know where a lot of stuff went. But our new neighbor lost their kitchen and garage to several trees falling, so I guess I will be thankful.

I will be blogging about the move and how we are working on a plastic free renovation. I warn you now, this is about to become a reno blog with plastic thrown in. You were warned.


How did everyone else fair with the earthquake and storm? Any brilliant plastic free renovation tips?

Friday, August 19, 2011

Day 215- Let it Begin

In honor of the recent events, I changed up the look of the blog. What do you think?

We have big news. BIG news. Approximately 3400 square feet of news. Can you guess? It rhymes with mouse.... Yes, the Hubbs and I bought a house! There will be updates on this house as time progresses, as it's a fine specimen of 1970s styling, but I will try to focus for the remainder of the year on the ability to be plastic free in both the move and the renovations.

Let's talk about packing first. As my mom likes to say, collecting china is a long a winding road to nowhere; so naturally I picked up that trait. If I had my druthers, I would wrap everything in bubble wrap, box it up, and call it a day. Well, we can't really do that now, so it's paper to the rescue. The Hubbs has been riding the DC metro to and from work recently, and on the metro, individuals are inclined to leave their newspapers. Score! Packing material. Really, we've been using the newspaper to fill the gaps in the boxes and purchasing paper from Home Depot to actually wrap the dishes. This way they are clean and not covered in metro cooties. We've also been buying individual boxes instead of a wrapped pack of boxes. But Carrie, you say, why don't you free cycle boxes from a grocery store? Well,  our last move as done by professional movers and they used standard size boxes, it was so much easier to pack the truck. So we now spend the $100 on boxes instead of $100 on gas tooling around to find the boxes. Thus far this is what the guest bedroom looks like:

Ok, I lied. There is another stack in there too. But you get the idea. Soon we'll be moving into the house, but for right now we've been working on it constantly. Let me just say that this:
Beautiful carpet, yes? 

The Hubbs and his glory work:


And this is what is underneath:


There is a special place in hell for those that carpet over hardwood. I say this as someone who's spent 6 hours this week pulling out carpet staples and tack strips by hand. 


Oh, and I've already bled my own blood and gotten a tetanus booster. Thanks carpeters. Thanks.